design-patterns
- design-patterns
- 创造设计模式
- 结构设计模式
- 行为设计模式
设计模式的类型
-
创造型 (Creational)
-
结构型(Structural)
-
行为型(Behavioral)
创造设计模式
创造型设计模式的关注点是如何实例化一个或是一组关联的对象。
创造型有下面几个例子
- Simple Factory
- Factory Method
- Abstract Factory
- Builder
- Prototype
- Singleton
1.🏠简单工厂模式(Simple Factory)
现实的例子
想象你要造一所房子,你需要一些门,你可以自己准备木头,胶水,你的木匠装备等等,你也可以把工作外包给工厂,让外包制造好门直接交付给你,这样你就不用了解制造门的细节了,也不会因为在家里施工而搞得一团糟。
简单总结
简单工厂模式封装了生成实例的方法,这样用户就可以直接调用这个方法,不需要知道创造实例的逻辑。
(简单工厂实际上不算是一种设计模式,相对于后续介绍的工厂方法来说.)
维基百科描述
在面向对象编程(OOP)中,工厂是用于创建其他对象的对象,形式上工厂是一个函数或方法,它从某个方法调用中返回不同原型或类的对象(这样我们就不用new这些对象来手动创建了)
typescript example
interface Door {
  getWidth(): number
  getHeight(): number
}
class WoodenDoor implements Door {
  protected width: number
  protected height: number
  constructor(width: number, height: number) {
    this.width = width
    this.height = height
  }
  getWidth(): number {
    return this.width
  }
  getHeight(): number {
    return this.height
  }
  deescribe() {
    console.log(`width:${this.getWidth()},height:${this.getHeight()}`)
  }
}
class DoorFactory {
  static makeDoor(width: number, height: number): WoodenDoor {
    return new WoodenDoor(width, height)
  }
}

const door = DoorFactory.makeDoor(100, 200)
door.deescribe()
const door2 = DoorFactory.makeDoor(300, 500)
door2.deescribe()
2.🏭工厂方法模式(Factory Method)
亦称: 虚拟构造函数、Virtual Constructor
现实的例子
考虑一个HR招人面试的例子,不可能每个职位都由一个人来面试。根据职位空缺,她必须决定并把面试步骤委派给不同的人。
简单总结
工厂方法模式提供了一种将实例化逻辑委托给子类的方法。
维基百科的描述
在基于类的编程中,工厂方法模式是一种创建工厂方法的创建模式,可以处理创建对象的问题而无需指定将创建的对象的确切类别。 这是通过通过调用在接口中指定的工厂方法来创建对象来完成对象,并由子类实现,或者在基类中实现,并且可选地由派生类覆盖 - 而不是通过调用构造函数。
优缺点
优点
- 你可以避免创建者和具体产品之间的紧密耦合。
- 单一职责原则。 你可以将产品创建代码放在程序的单一位置, 从而使得代码更容易维护。
- 开闭原则。 无需更改现有客户端代码, 你就可以在程序中引入新的产品类型。
缺点
- 应用工厂方法模式需要引入许多新的子类, 代码可能会因此变得更复杂。 最好的情况是将该模式引入创建者类的现有层次结构中。
伪代码
// 创建者类声明的工厂方法必须返回一个产品类的对象。创建者的子类通常会提供
// 该方法的实现。
class Dialog is
    // 创建者还可提供一些工厂方法的默认实现。
    abstract method createButton():Button

    // 请注意,创建者的主要职责并非是创建产品。其中通常会包含一些核心业务
    // 逻辑,这些逻辑依赖于由工厂方法返回的产品对象。子类可通过重写工厂方
    // 法并使其返回不同类型的产品来间接修改业务逻辑。
    method render() is
        // 调用工厂方法创建一个产品对象。
        Button okButton = createButton()
        // 现在使用产品。
        okButton.onClick(closeDialog)
        okButton.render()


// 具体创建者将重写工厂方法以改变其所返回的产品类型。
class WindowsDialog extends Dialog is
    method createButton():Button is
        return new WindowsButton()

class WebDialog extends Dialog is
    method createButton():Button is
        return new HTMLButton()


// 产品接口中将声明所有具体产品都必须实现的操作。
interface Button is
    method render()
    method onClick(f)

// 具体产品需提供产品接口的各种实现。
class WindowsButton implements Button is
    method render(a, b) is
        // 根据 Windows 样式渲染按钮。
    method onClick(f) is
        // 绑定本地操作系统点击事件。

class HTMLButton implements Button is
    method render(a, b) is
        // 返回一个按钮的 HTML 表述。
    method onClick(f) is
        // 绑定网络浏览器的点击事件。


class Application is
    field dialog: Dialog

    // 程序根据当前配置或环境设定选择创建者的类型。
    method initialize() is
        config = readApplicationConfigFile()

        if (config.OS == "Windows") then
            dialog = new WindowsDialog()
        else if (config.OS == "Web") then
            dialog = new WebDialog()
        else
            throw new Exception("错误!未知的操作系统。")

    // 当前客户端代码会与具体创建者的实例进行交互,但是必须通过其基本接口
    // 进行。只要客户端通过基本接口与创建者进行交互,你就可将任何创建者子
    // 类传递给客户端。
    method main() is
        this.initialize()
        dialog.render()
typescript example
下面是这个HR找面试官例子的代码实现
HiringManager抽象类就是工厂类,相当于简单工厂的情况下,把这个工厂方法变抽象,让给外部去继承实现实例化。
interface Interviewer {
  askQuestions(): void
}

class Developer implements Interviewer {
  askQuestions(): void {
    console.log('ask about design patterns!')
  }
}

class CommunityExecutive implements Interviewer {
  askQuestions(): void {
    console.log('ask more about community building')
  }
}

abstract class HiringManager {
  protected abstract makeInterviewer(): Interviewer
  takeInterview() {
    const interviewer = this.makeInterviewer()
    interviewer.askQuestions()
  }
}

class DevelopmentManager extends HiringManager {
  protected makeInterviewer(): Interviewer {
    return new Developer()
  }
}

class MarketingManager extends HiringManager {
  protected makeInterviewer(): Interviewer {
    return new CommunityExecutive()
  }
}

const devManager = new DevelopmentManager()
devManager.takeInterview()

const marketManager = new MarketingManager()
marketManager.takeInterview()
另一个例子
/**
 * The Creator class declares the factory method that is supposed to return an
 * object of a Product class. The Creator's subclasses usually provide the
 * implementation of this method.
 */
abstract class Creator {
    /**
     * Note that the Creator may also provide some default implementation of the
     * factory method.
     */
    public abstract factoryMethod(): Product;

    /**
     * Also note that, despite its name, the Creator's primary responsibility is
     * not creating products. Usually, it contains some core business logic that
     * relies on Product objects, returned by the factory method. Subclasses can
     * indirectly change that business logic by overriding the factory method
     * and returning a different type of product from it.
     */
    public someOperation(): string {
        // Call the factory method to create a Product object.
        const product = this.factoryMethod();
        // Now, use the product.
        return `Creator: The same creator's code has just worked with ${product.operation()}`;
    }
}

/**
 * Concrete Creators override the factory method in order to change the
 * resulting product's type.
 */
class ConcreteCreator1 extends Creator {
    /**
     * Note that the signature of the method still uses the abstract product
     * type, even though the concrete product is actually returned from the
     * method. This way the Creator can stay independent of concrete product
     * classes.
     */
    public factoryMethod(): Product {
        return new ConcreteProduct1();
    }
}

class ConcreteCreator2 extends Creator {
    public factoryMethod(): Product {
        return new ConcreteProduct2();
    }
}

/**
 * The Product interface declares the operations that all concrete products must
 * implement.
 */
interface Product {
    operation(): string;
}

/**
 * Concrete Products provide various implementations of the Product interface.
 */
class ConcreteProduct1 implements Product {
    public operation(): string {
        return '{Result of the ConcreteProduct1}';
    }
}

class ConcreteProduct2 implements Product {
    public operation(): string {
        return '{Result of the ConcreteProduct2}';
    }
}

/**
 * The client code works with an instance of a concrete creator, albeit through
 * its base interface. As long as the client keeps working with the creator via
 * the base interface, you can pass it any creator's subclass.
 */
function clientCode(creator: Creator) {
    // ...
    console.log('Client: I\'m not aware of the creator\'s class, but it still works.');
    console.log(creator.someOperation());
    // ...
}

/**
 * The Application picks a creator's type depending on the configuration or
 * environment.
 */
console.log('App: Launched with the ConcreteCreator1.');
clientCode(new ConcreteCreator1());
console.log('');

console.log('App: Launched with the ConcreteCreator2.');
clientCode(new ConcreteCreator2());
3.🔨抽象工厂模式 Abstract Factory
现实的例子:
回到之间使用的简单工厂的门的例子,您可以从木门商店得到木门,铁门商店或PVC门从相关的商店。另外,你可能需要一个有不同专业的人来装门,例如木匠做木门,焊工做铁门等。正如你所看到的,现在门之间有一个依赖关系,木门需要木匠,铁门需要焊工等等。
简单总结
工厂的工厂,将个别但相关/依赖的工厂分组在一起而不指定它们的具体类的工厂。
维基百科的描述
抽象工厂模式提供了一种方式来封装一组具有公共主题的独立工厂,而无需指定它们的具体类
优缺点
优点
- 你可以确保同一工厂生成的产品相互匹配。
- 你可以避免客户端和具体产品代码的耦合。
- 单一职责原则。 你可以将产品生成代码抽取到同一位置, 使得代码易于维护。
- 开闭原则。 向应用程序中引入新产品变体时, 你无需修改客户端代码。
缺点
- 由于采用该模式需要向应用中引入众多接口和类, 代码可能会比之前更加复杂。
typescript example
下面是这个木门例子的typescript代码
interface Door {
  getDescription(): void
}

class WoodenDoor implements Door {
  getDescription(): void {
    console.log('I am a wooden door')
  }
}
class IronDoor implements Door {
  getDescription(): void {
    console.log('i am an iron door')
  }
}

interface DoorFittingExpert {
  getDescription(): void
}

class Welder implements DoorFittingExpert {
  getDescription(): void {
    console.log('i can only fit iron doors')
  }
}
class Carpenter implements DoorFittingExpert {
  getDescription(): void {
    console.log('i can only fit wooden doors')
  }
}
interface DoorFactory {
  makeDoor(): Door
  makeFittingExpert(): DoorFittingExpert
}
class WoodenDoorFactory implements DoorFactory {
  makeDoor(): Door {
    return new WoodenDoor()
  }
  makeFittingExpert(): DoorFittingExpert {
    return new Carpenter()
  }
}

class IronDoorFactory implements DoorFactory {
  makeDoor(): Door {
    return new IronDoor()
  }
  makeFittingExpert(): DoorFittingExpert {
    return new Welder()
  }
}

const woodenFactory = new WoodenDoorFactory()
const door = woodenFactory.makeDoor()
const expert = woodenFactory.makeFittingExpert()
door.getDescription()
expert.getDescription()
export {}
4.💍单例模式(Singleton)
亦称: 单件模式
现实的例子
一个国家只能有一个总统,总统始终是一个。
简单总结
确保只创建特定类的一个对象。
维基百科的描述
在软件工程中,单例模式是一种软件设计模式,它将类的实例化限制在一个对象中。当只需要一个对象来协调整个系统的操作时,这很有用。
单例模式实际上被认为是反模式,应该避免过度使用它。它并不一定是坏的,可能会有一些有效的用例,但是应该谨慎使用,因为它会在应用程序中引入一个全局状态,在一个地方对它的更改可能会影响到其他区域,并且它可能变得非常难以调试。它们的另一个缺点是它使你的代码紧密耦合,再加上mock单例可能会很困难。
优缺点
优点
- 你可以保证一个类只有一个实例。
- 你获得了一个指向该实例的全局访问节点。
- 仅在首次请求单例对象时对其进行初始化。
缺点
- 违反了_单一职责原则_。 该模式同时解决了两个问题。
- 单例模式可能掩盖不良设计, 比如程序各组件之间相互了解过多等。
- 该模式在多线程环境下需要进行特殊处理, 避免多个线程多次创建单例对象。
- 单例的客户端代码单元测试可能会比较困难, 因为许多测试框架以基于继承的方式创建模拟对象。 由于单例类的构造函数是私有的, 而且绝大部分语言无法重写静态方法, 所以你需要想出仔细考虑模拟单例的方法。 要么干脆不编写测试代码, 或者不使用单例模式。
typescript example
class President {
  private static instance: President
  private constructor() {}
  static getInstance(): President {
    if (!this.instance) {
      this.instance = new this()
    }
    return this.instance
  }
}

const president1 = President.getInstance()
const president2 = President.getInstance()
console.log(president1 == president2)
5.👷生成器模式(Builder)
亦称: 建造者模式
现实的例子
例如,你想要一份定制的赛百味套餐,你可以选择几种汉堡的制作方法,比如你想要哪种面包?您喜欢什么酱汁?你想要什么奶酪?等。在这种情况下,构建器模式可以提供帮助。
简单总结
生成器模式是一种创建型设计模式, 使你能够分步骤创建复杂对象。 该模式允许你使用相同的创建代码生成不同类型和形式的对象。
优缺点
优点
- 你可以分步创建对象, 暂缓创建步骤或递归运行创建步骤。
- 生成不同形式的产品时, 你可以复用相同的制造代码。
- 单一职责原则。 你可以将复杂构造代码从产品的业务逻辑中分离出来
缺点
- 由于该模式需要新增多个类, 因此代码整体复杂程度会有所增加。
typescript example
class Burger {
  protected size: number
  protected cheese = false
  protected pepperoni = false
  protected lettuce = false
  protected tomato = false
  constructor(builder: BurgerBuilder) {
    this.size = builder.size
    this.cheese = builder.cheese
    this.pepperoni = builder.pepperoni
    this.lettuce = builder.lettuce
    this.tomato = builder.tomato
  }
}

class BurgerBuilder {
  size: number
  cheese = false
  pepperoni = false
  lettuce = false
  tomato = false
  constructor(size: number) {
    this.size = size
  }
  addPepperoni() {
    this.pepperoni = true
    return this
  }
  addLettuce() {
    this.lettuce = true
    return this
  }
  addCheese() {
    this.cheese = true
    return this
  }
  addTomato() {
    this.tomato = true
    return this
  }
  build(): Burger {
    return new Burger(this)
  }
}

const burger = new BurgerBuilder(14).addCheese().addPepperoni().build()
6.🐑原型模式(Prototype)
亦称: 克隆、Clone
现实的例子
还记得多莉?那只克隆羊!我们就不谈细节了,但这里的关键是这都是关于克隆的
简单总结
原型模式是一种创建型设计模式, 使你能够复制已有对象, 而又无需使代码依赖它们所属的类。
适合的使用场景
如果你需要复制一些对象, 同时又希望代码独立于这些对象所属的具体类, 可以使用原型模式。
这一点考量通常出现在代码需要处理第三方代码通过接口传递过来的对象时。 即使不考虑代码耦合的情况, 你的代码也不能依赖这些对象所属的具体类, 因为你不知道它们的具体信息。
原型模式为客户端代码提供一个通用接口, 客户端代码可通过这一接口与所有实现了克隆的对象进行交互, 它也使得客户端代码与其所克隆的对象具体类独立开来。
如果子类的区别仅在于其对象的初始化方式, 那么你可以使用该模式来减少子类的数量。 别人创建这些子类的目的可能是为了创建特定类型的对象。
在原型模式中, 你可以使用一系列预生成的、 各种类型的对象作为原型。
客户端不必根据需求对子类进行实例化, 只需找到合适的原型并对其进行克隆即可。
优缺点
优点
- 你可以克隆对象, 而无需与它们所属的具体类相耦合。
- 你可以克隆预生成原型, 避免反复运行初始化代码。
- 你可以更方便地生成复杂对象。
- 你可以用继承以外的方式来处理复杂对象的不同配置。
缺点
- 克隆包含循环引用的复杂对象可能会非常麻烦。
typescript example
class Sheep {
  protected name: string
  protected category: string
  constructor(name: string, category = 'Mountain Sheep') {
    this.name = name
    this.category = category
  }
  setName(name: string) {
    this.name = name
  }
  getName() {
    return this.name
  }
  setCategory(category: string) {
    this.category = category
  }
  getCategory() {
    return this.category
  }
}

const original = new Sheep('Jolly')
console.log(`name:${original.getName()}, category: ${original.getCategory()}`)

// 需要调用一个深拷贝方法,js原生并没有这种方法
结构设计模式
结构设计模式主要关注对象组合,换句话说,实体如何相互使用。或者另一种解释是,它们有助于回答“如何构建软件组件”
1.☕ 装饰器模式(Decorator)
亦称: 装饰者模式、装饰器模式、Wrapper、Decorator
现实的例子
假设你经营一家咖啡店,计算账单的时候需要根据添加的各种原料计算最终的成本,这个情况下,每个添加的原料可以作为装饰器
(实际上碰到这种例子,查表就可以了吧,价格不必硬编码到程序里)
简单总结
装饰器模式允许你通过用一个装饰器类包裹对象,在运行时对一个对象动态添加行为
维基百科的解释
在面向对象编程中,装饰器模式是一种设计模式,它允许将行为静态或动态地添加到单个对象中,而不会影响来自同一类的其他对象的行为。decorator模式对于遵循单一职责原则通常很有用,因为它允许在具有唯一关注区域的类之间划分功能。
优缺点
优点
- 你无需创建新子类即可扩展对象的行为。
- 你可以在运行时添加或删除对象的功能。
- 你可以用多个装饰封装对象来组合几种行为。
- 单一职责原则。 你可以将实现了许多不同行为的一个大类拆分为多个较小的类。
缺点
- 在封装器栈中删除特定封装器比较困难。
- 实现行为不受装饰栈顺序影响的装饰比较困难。
- 各层的初始化配置代码看上去可能会很糟糕。
typescript example
下面时coffee例子的
interface Coffee {
  getCost(): number
  getDescription(): string
}

class SimpleCoffee implements Coffee {
  getCost() {
    return 10
  }
  getDescription() {
    return 'simple coffee'
  }
}

class MilkDecorator implements Coffee {
  protected coffee: Coffee
  protected description: string
  constructor(c: Coffee) {
    this.coffee = c
    this.description = 'milk'
  }
  getCost() {
    return 4 + this.coffee.getCost()
  }
  getDescription() {
    return this.coffee.getDescription() + ' ' + this.description
  }
}
class WhipDecorator implements Coffee {
  protected coffee: Coffee
  protected description: string
  constructor(c: Coffee) {
    this.coffee = c
    this.description = 'whip'
  }
  getCost() {
    return 5 + this.coffee.getCost()
  }
  getDescription() {
    return this.coffee.getDescription() + ' ' + this.description
  }
}
// 香草
class VanillaDecorator implements Coffee {
  protected coffee: Coffee
  protected description: string
  constructor(c: Coffee) {
    this.coffee = c
    this.description = 'vanilla'
  }
  getCost() {
    return 3 + this.coffee.getCost()
  }
  getDescription() {
    return this.coffee.getDescription() + ' ' + this.description
  }
}

const simpleCoffee = new SimpleCoffee()
console.log(simpleCoffee.getDescription())
console.log(simpleCoffee.getCost())

const milkCoffee = new MilkDecorator(simpleCoffee)
console.log(milkCoffee.getDescription())
console.log(milkCoffee.getCost())

const mixCoffee = new VanillaDecorator(
  new MilkDecorator(new WhipDecorator(simpleCoffee))
)

console.log(mixCoffee.getDescription())
console.log(mixCoffee.getCost())
export{}
2.🔌 适配器模式(Adapter)
亦称: 封装器模式、Wrapper
现实的例子
考虑到你的记忆卡中有一些图片,你需要把它们转移到你的电脑上。为了传输它们,你需要某种适配器,它与你的计算机端口兼容,这样你就可以把存储卡连接到你的计算机上。在这种情况下,读卡器是一个适配器。另一个例子是著名的电源适配器;三脚插头不能连接到两个尖头插座,它需要使用电源适配器,使其兼容两个尖头插座。还有一个例子是译者将一个人说的话翻译给另一个人
简单总结
适配器模式允许您在适配器中包装其他不兼容的对象以使其与另一个类兼容。
维基百科的描述
在软件工程中,适配器模式是一种软件设计模式,它允许将现有类的接口用作另一个接口。它通常用于使现有的类与其他类一起工作,而不修改它们的源代码。
优缺点
优点
- _单一职责原则_你可以将接口或数据转换代码从程序主要业务逻辑中分离。
- 开闭原则。 只要客户端代码通过客户端接口与适配器进行交互, 你就能在不修改现有客户端代码的情况下在程序中添加新类型的适配器。
缺点
- 代码整体复杂度增加, 因为你需要新增一系列接口和类。 有时直接更改服务类使其与其他代码兼容会更简单。
typescript example
想象一个猎人猎杀式子的游戏,现在我们加入狗,同时用适配器模式让猎人的猎人模块兼容狗
interface Lion {
  roar(): void
}

class AfricanLion implements Lion {
  roar(): void {
    console.log('aouuuuuuuu!')
  }
}
class AsianLion implements Lion {
  roar(): void {
    console.log('aooooooooooo!')
  }
}

class Hunter {
  hunt(lion: Lion) {
    lion.roar()
  }
}

class WildDog {
  bark(): void {
    console.log('wang!wang!wang!')
  }
}

class WildDogAdapter implements Lion {
  protected dog
  constructor(dog: WildDog) {
    this.dog = dog
  }
  roar(): void {
    this.dog.bark()
  }
}

const wildDog = new WildDog()
const wildDogAdapter = new WildDogAdapter(wildDog)
const hunter = new Hunter()
hunter.hunt(wildDogAdapter)
3.📦 外观模式(Facade)
**亦称:**门面模式
现实的例子
(这台电脑怎么开机?)你会说“按电源按钮”!这就是你所相信的,因为你使用的是计算机提供的一个简单的界面,内部它需要做很多事情来实现它。这个到复杂子系统的简单接口就是facade。
简单总结
Facade模式为复杂的子系统提供了简化的接口。
维基百科的描述
facade是一个对象,它为更大的代码体(如类库)提供了简化的接口。
优缺点
优点
- 你可以让自己的代码独立于复杂子系统。
缺点
- 外观可能成为与程序中所有类都耦合的上帝对象(指的是了解过多,或者负责过多的对象)。
typescript example
class Computer {
  // 断电
  getElectricShock() {
    console.log('Ouch')
  }
  makeSound() {
    console.log('Beep beep!')
  }
  showLoadingScreen() {
    console.log('Loading...')
  }
  bam() {
    console.log('Ready to be used')
  }
  closeEverything() {
    console.log('Bup bup bup buzzzz!')
  }
  sooth() {
    console.log('Zzzzz')
  }
  pullCurrent() {
    console.log('Haaah!')
  }
}
class ComputerFacade {
  protected computer
  constructor(computer: Computer) {
    this.computer = computer
  }
  turnOn() {
    this.computer.getElectricShock()
    this.computer.makeSound()
    this.computer.showLoadingScreen()
    this.computer.bam()
  }
  turnOff() {
    this.computer.closeEverything()
    this.computer.pullCurrent()
    this.computer.sooth()
  }
}

const computer = new ComputerFacade(new Computer())
computer.turnOn()
computer.turnOff()
4.🌿组合模式 (Composite)
亦称: 对象树、Object Tree
现实的例子
每个组织都是由员工组成的。每个员工都有相同的特征,比如有薪水,有一些职责,可能有也可能没有向某人汇报,可能有也可能没有下属等等。
大部分国家的军队都采用层次结构管理。 每支部队包括几个师, 师由旅构成, 旅由团构成, 团可以继续划分为排。 最后, 每个排由一小队实实在在的士兵组成。 军事命令由最高层下达, 通过每个层级传递, 直到每位士兵都知道自己应该服从的命令。
简单总结
组合模式是一种结构型设计模式, 你可以使用它将对象组合成树状结构, 并且能像使用独立对象一样使用它们。
维基百科的解释
在软件工程中,组合模式是一种分区设计模式。组合模式描述了将一组对象作为对象的单个实例进行处理的方式。组合的目的是将对象“组合”成树结构,以表示部分-整体层次结构。实现组合模式让客户端能够统一对待单个对象和组合。
优缺点
优点
- 你可以利用多态和递归机制更方便地使用复杂树结构。
- 开闭原则。 无需更改现有代码, 你就可以在应用中添加新元素, 使其成为对象树的一部分。
缺点
- 对于功能差异较大的类, 提供公共接口或许会有困难。 在特定情况下, 你需要过度一般化组件接口, 使其变得令人难以理解。
typescript example
/**
 * The base Component class declares common operations for both simple and
 * complex objects of a composition.
 */
abstract class Component {
  protected parent!: Component | null

  /**
   * Optionally, the base Component can declare an interface for setting and
   * accessing a parent of the component in a tree structure. It can also
   * provide some default implementation for these methods.
   */
  public setParent(parent: Component | null) {
    this.parent = parent
  }

  public getParent(): Component | null {
    return this.parent
  }

  /**
   * In some cases, it would be beneficial to define the child-management
   * operations right in the base Component class. This way, you won't need to
   * expose any concrete component classes to the client code, even during the
   * object tree assembly. The downside is that these methods will be empty
   * for the leaf-level components.
   */
  public add(component: Component): void {}

  public remove(component: Component): void {}

  /**
   * You can provide a method that lets the client code figure out whether a
   * component can bear children.
   */
  public isComposite(): boolean {
    return false
  }

  /**
   * The base Component may implement some default behavior or leave it to
   * concrete classes (by declaring the method containing the behavior as
   * "abstract").
   */
  public abstract operation(): string
}

/**
 * The Leaf class represents the end objects of a composition. A leaf can't have
 * any children.
 *
 * Usually, it's the Leaf objects that do the actual work, whereas Composite
 * objects only delegate to their sub-components.
 */
class Leaf extends Component {
  public operation(): string {
    return 'Leaf'
  }
}

/**
 * The Composite class represents the complex components that may have children.
 * Usually, the Composite objects delegate the actual work to their children and
 * then "sum-up" the result.
 */
class Composite extends Component {
  protected children: Component[] = []

  /**
   * A composite object can add or remove other components (both simple or
   * complex) to or from its child list.
   */
  public add(component: Component): void {
    this.children.push(component)
    component.setParent(this)
  }

  public remove(component: Component): void {
    const componentIndex = this.children.indexOf(component)
    this.children.splice(componentIndex, 1)

    component.setParent(null)
  }

  public isComposite(): boolean {
    return true
  }

  /**
   * The Composite executes its primary logic in a particular way. It
   * traverses recursively through all its children, collecting and summing
   * their results. Since the composite's children pass these calls to their
   * children and so forth, the whole object tree is traversed as a result.
   */
  public operation(): string {
    const results = []
    for (const child of this.children) {
      results.push(child.operation())
    }

    return `Branch(${results.join('+')})`
  }
}

/**
 * The client code works with all of the components via the base interface.
 */
function clientCode(component: Component) {
  // ...

  console.log(`RESULT: ${component.operation()}`)

  // ...
}

/**
 * This way the client code can support the simple leaf components...
 */
const simple = new Leaf()
console.log("Client: I've got a simple component:")
clientCode(simple)
console.log('')

/**
 * ...as well as the complex composites.
 */
const tree = new Composite()
const branch1 = new Composite()
branch1.add(new Leaf())
branch1.add(new Leaf())
const branch2 = new Composite()
branch2.add(new Leaf())
tree.add(branch1)
tree.add(branch2)
console.log("Client: Now I've got a composite tree:")
clientCode(tree)
console.log('')

/**
 * Thanks to the fact that the child-management operations are declared in the
 * base Component class, the client code can work with any component, simple or
 * complex, without depending on their concrete classes.
 */
function clientCode2(component1: Component, component2: Component) {
  // ...

  if (component1.isComposite()) {
    component1.add(component2)
  }
  console.log(`RESULT: ${component1.operation()}`)

  // ...
}

console.log(
  "Client: I don't need to check the components classes even when managing the tree:"
)
clientCode2(tree, simple)
5.🎱 代理模式(Proxy)
现实的例子
你用过门禁卡进出一扇门吗?开门有多种选择,比如,可以使用门禁卡打开,也可以通过按下绕过安全的按钮打开。门的主要功能是打开,但在上面添加了一个代理来添加一些功能。让我用下面的代码示例更好地解释它。
信用卡是银行账户的代理, 银行账户则是一大捆现金的代理。 它们都实现了同样的接口, 均可用于进行支付。 消费者会非常满意, 因为不必随身携带大量现金; 商店老板同样会十分高兴, 因为交易收入能以电子化的方式进入商店的银行账户中, 无需担心存款时出现现金丢失或被抢劫的情况。
简单总结
代理模式是一种结构型设计模式, 让你能够提供对象的替代品或其占位符。 代理控制着对于原对象的访问, 并允许在将请求提交给对象前后进行一些处理。
优缺点
优点
- 你可以在客户端毫无察觉的情况下控制服务对象。
- 如果客户端对服务对象的生命周期没有特殊要求, 你可以对生命周期进行管理。
- 即使服务对象还未准备好或不存在, 代理也可以正常工作。
- 开闭原则。 你可以在不对服务或客户端做出修改的情况下创建新代理。
缺点
- 代码可能会变得复杂, 因为需要新建许多类。
- 服务响应可能会延迟。
与其他模式的联系
-
适配器模式能为被封装对象提供不同的接口, 代理模式能为对象提供相同的接口, 装饰模式则能为对象提供加强的接口。
-
外观模式与代理的相似之处在于它们都缓存了一个复杂实体并自行对其进行初始化。 代理与其服务对象遵循同一接口, 使得自己和服务对象可以互换, 在这一点上它与外观不同。
-
装饰和代理有着相似的结构, 但是其意图却非常不同。 这两个模式的构建都基于组合原则, 也就是说一个对象应该将部分工作委派给另一个对象。 两者之间的不同之处在于代理通常自行管理其服务对象的生命周期, 而装饰的生成则总是由客户端进行控制。
typescript example
interface Door {
  open(): void
  close(): void
}

class LabDoor implements Door {
  open(): void {
    console.log('opening the lab door')
  }
  close(): void {
    console.log('closing the lab door')
  }
}

class SecuredDoor {
  protected door: Door
  protected password = '123456'
  constructor(door: Door) {
    this.door = door
  }
  open(password: string) {
    if (this.authenticate(password)) {
      this.door.open()
    } else {
      console.log('No,you cant open this door')
    }
  }

  authenticate(passwords: string) {
    return this.password == passwords
  }
  close() {
    this.door.close()
  }
}

const door = new SecuredDoor(new LabDoor())

door.open('1234567')
door.open('123456')
door.close()
6.🚡 桥接模式(Bridge)
现实的例子
假设你有一个有不同页面的网站,你应该允许用户更改主题。你会怎么做?为每个主题创建每个页面的多个副本,还是只创建单独的主题并根据用户的偏好加载它们?桥牌模式允许你做后者,如下图
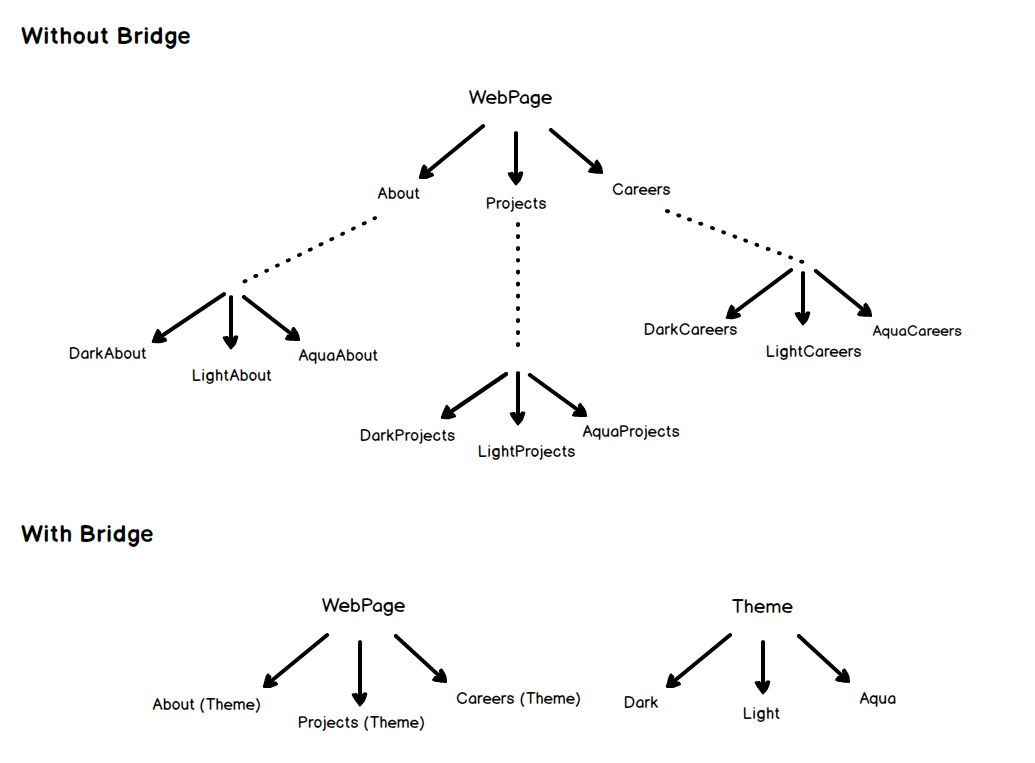
假如你有一个几何 形状Shape类, 从它能扩展出两个子类: 圆形Circle和 方形Square 。 你希望对这样的类层次结构进行扩展以使其包含颜色, 所以你打算创建名为 红色Red和 蓝色Blue的形状子类。 但是, 由于你已有两个子类, 所以总共需要创建四个类才能覆盖所有组合, 例如 蓝色圆形BlueCircle和 红色方形RedSquare 。
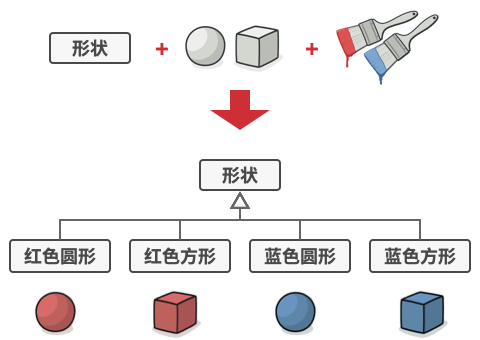
所有组合类的数量将以几何级数增长。
在层次结构中新增形状和颜色将导致代码复杂程度指数增长。 例如添加三角形状, 你需要新增两个子类, 也就是每种颜色一个; 此后新增一种新颜色需要新增三个子类, 即每种形状一个。 如此以往, 情况会越来越糟糕。
问题的根本原因是我们试图在两个独立的维度——形状与颜色——上扩展形状类。 这在处理类继承时是很常见的问题。
桥接模式通过将继承改为组合的方式来解决这个问题。 具体来说, 就是抽取其中一个维度并使之成为独立的类层次, 这样就可以在初始类中引用这个新层次的对象, 从而使得一个类不必拥有所有的状态和行为。
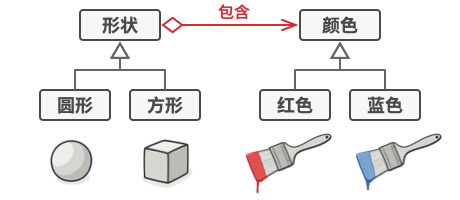
将一个类层次转化为多个相关的类层次, 避免单个类层次的失控。
根据该方法, 我们可以将颜色相关的代码抽取到拥有 红色和 蓝色两个子类的颜色类中, 然后在 形状类中添加一个指向某一颜色对象的引用成员变量。 现在, 形状类可以将所有与颜色相关的工作委派给连入的颜色对象。 这样的引用就成为了 形状和 颜色之间的桥梁。 此后, 新增颜色将不再需要修改形状的类层次, 反之亦然。
简单总结
桥接模式是一种结构型设计模式, 可将一个大类或一系列紧密相关的类拆分为抽象和实现两个独立的层次结构, 从而能在开发时分别使用。
优缺点
优点
- 你可以创建与平台无关的类和程序。
- 客户端代码仅与高层抽象部分进行互动, 不会接触到平台的详细信息。
- 开闭原则。 你可以新增抽象部分和实现部分, 且它们之间不会相互影响。
- 单一职责原则。 抽象部分专注于处理高层逻辑, 实现部分处理平台细节。
缺点
- 对高内聚的类使用该模式可能会让代码更加复杂。
typescript example
这里实现那个网页换主题的例子
abstract class WebPage {
  protected abstract theme: Theme

  abstract getContent(): string
}

class About extends WebPage {
  protected theme: Theme
  constructor(theme: Theme) {
    super()
    this.theme = theme
  }
  getContent(): string {
    return `about page in ${this.theme.getColor()}`
  }
}

interface Theme {
  getColor(): string
}

class Careers extends WebPage {
  protected theme: Theme
  constructor(theme: Theme) {
    super()
    this.theme = theme
  }
  getContent() {
    return `careers page in ${this.theme.getColor()}`
  }
}

class DarkTheme implements Theme {
  getColor(): string {
    return 'Dark Black'
  }
}

class LightTheme implements Theme {
  getColor(): string {
    return 'Off white'
  }
}

class AquaTheme implements Theme {
  getColor(): string {
    return 'Light blue'
  }
}

const darkTheme = new DarkTheme()
const about = new About(darkTheme)
const careers = new Careers(darkTheme)
console.log(about.getContent())
console.log(careers.getContent())
7.🍃享元模式(Flyweight)
亦称: 缓存、Cache
现实的例子
你在什么摊位上喝过新鲜的茶吗?他们通常会制作不止一个杯子,除了你使用的那个,剩下的留给其他客户,以节省资源。Flyweight模式就是关于资源共享的。
简单总结
享元模式是一种结构型设计模式, 它摒弃了在每个对象中保存所有数据的方式, 通过共享多个对象所共有的相同状态, 让你能在有限的内存容量中载入更多对象。
维基百科的解释
在计算机编程中,flyweight是一种软件设计模式。flyweight是通过与其他类似对象共享尽可能多的数据来最小化内存使用的对象;当一个简单的重复表示将使用不可接受的内存量时,它是一种大量使用对象的方法
优缺点
优点
- 如果程序中有很多相似对象, 那么你将可以节省大量内存。
缺点
- 你可能需要牺牲执行速度来换取内存, 因为他人每次调用享元方法时都需要重新计算部分情景数据。
- 代码会变得更加复杂。 团队中的新成员总是会问: “为什么要像这样拆分一个实体的状态?”。
typescript example
class KaraTea {}

interface Tea {
  [key: string]: KaraTea
}
interface Order {
  [key: number]: KaraTea
}
class TeaMaker {
  protected availableTea: Tea = {}
  make(preference: string) {
    if (!this.availableTea[preference]) {
      this.availableTea[preference] = new KaraTea()
    }
    return this.availableTea[preference]
  }
}

class Teashop {
  protected orders: Order = {}
  protected teaMaker: TeaMaker
  constructor(teaMaker: TeaMaker) {
    this.teaMaker = teaMaker
  }
  takeOrder(teaType: string, table: number) {
    this.orders[table] = this.teaMaker.make(teaType)
  }
  server() {
    for (const key in this.orders) {
      console.log(`Serving Tea to table#${key} `)
    }
  }
}

const teaMaker = new TeaMaker()
const shop = new Teashop(teaMaker)

shop.takeOrder('less sugar', 1)
shop.takeOrder('more milk', 2)
shop.takeOrder('without sugar', 5)
shop.server()
行为设计模式
行为设计模式涉及到对象之间的职责分配,和结构模式的不同之处在于,它不仅指定了结构,而且概述了消息传递的模式,换句话说,这有助于回答“如何在软件组织中运行一个行为”。
这里介绍以下几种:
- Chain of Responsibility
- Command
- Iterator
- Mediator
- Memento
- Observer
- Visitor
- Strategy
- State
- Template Method
1.💡策略模式(Strategy)
现实例子
举一个排序的例子,我们首先实现了冒泡排序,但是随着数据量的增长我们发现冒泡排序的效率变得很慢,为此,我们又实现了快速排序处理大数据,但是这个快速排序处理小规模数据的效率比较低,所以为了处理这个问题,我们又实现了一个针对小规模数据的策略,使得在大规模数据上使用快速排序,小规模数据使用冒泡排序。
简单总结
策略模式允许您根据情况切换算法或策略
(实际上在js里面由于函数是一等公民,第一个参数设为函数,之后传入不同的排序函数就能达成类似的效果,也不需要用到多态)
优缺点
优点
- 你可以在运行时切换对象内的算法。
- 你可以将算法的实现和使用算法的代码隔离开来。
- 你可以使用组合来代替继承。
- 开闭原则。 你无需对上下文进行修改就能够引入新的策略。
缺点:
- 如果你的算法极少发生改变, 那么没有任何理由引入新的类和接口。 使用该模式只会让程序过于复杂。
- 客户端必须知晓策略间的不同——它需要选择合适的策略。
- 许多现代编程语言支持函数类型功能, 允许你在一组匿名函数中实现不同版本的算法。 这样, 你使用这些函数的方式就和使用策略对象时完全相同, 无需借助额外的类和接口来保持代码简洁。
typescript example
typescript 给JavaScript添加了更完善的面向对象支持,支持类型和interface
下面是用typescript实现这个排序的例子的代码
interface SortStrategy {
  sort(arr: Array<number>): Array<number>
}

class BubbleSortStrategy implements SortStrategy {
  sort(arr: number[]): number[] {
    console.log('do bubble sort')
    return arr
  }
}

class QuickSortStrategy implements SortStrategy {
  sort(arr: number[]): number[] {
    console.log('do quick sort')
    return arr
  }
}

class Sorter {
  sortStrategy: SortStrategy
  constructor(sortStrategy: SortStrategy) {
    this.sortStrategy = sortStrategy
  }
  sort(arr: Array<number>): Array<number> {
    return this.sortStrategy.sort(arr)
  }
}

new Sorter(new BubbleSortStrategy()).sort([9, 2, 4, 3, 5])
new Sorter(new QuickSortStrategy()).sort([9, 2, 4, 3, 5])
实际上最后生成es5的代码,里面就没有接口了,
JavaScript的多态和python一样,是通过鸭子类型实现的。
"use strict";
var BubbleSortStrategy = /** @class */ (function () {
    function BubbleSortStrategy() {
    }
    BubbleSortStrategy.prototype.sort = function (arr) {
        console.log('do bubble sort');
        return arr;
    };
    return BubbleSortStrategy;
}());
var QuickSortStrategy = /** @class */ (function () {
    function QuickSortStrategy() {
    }
    QuickSortStrategy.prototype.sort = function (arr) {
        console.log('do quick sort');
        return arr;
    };
    return QuickSortStrategy;
}());
var Sorter = /** @class */ (function () {
    function Sorter(sortStrategy) {
        this.sortStrategy = sortStrategy;
    }
    Sorter.prototype.sort = function (arr) {
        return this.sortStrategy.sort(arr);
    };
    return Sorter;
}());
new Sorter(new BubbleSortStrategy()).sort([9, 2, 4, 3, 5]);
new Sorter(new QuickSortStrategy()).sort([9, 2, 4, 3, 5]);
下面是按照head first 设计模式,这本书第一个例子实现的鸭子模拟器代码。
使用了策略模式,把给鸭子添加各种行为的代码抽离出来了,使得添加新的行为的代码改动比较小,并且可以动态改变行为。
interface FlyBehavior {
  fly(): void
}
class FlyWithWings implements FlyBehavior {
  fly(): void {
    console.log('i can fly')
  }
}
class FlyNoWay implements FlyBehavior {
  fly(): void {
    console.log('i can not fly')
  }
}
class FlyRocketPowered implements FlyBehavior {
  fly(): void {
    console.log('fly with a rocket!!!!!!!')
  }
}

interface QuackBehavior {
  quack(): void
}
class Quack implements QuackBehavior {
  quack(): void {
    console.log('quack!!!')
  }
}

class MuteQuack implements QuackBehavior {
  quack(): void {
    console.log('<<Silence>>')
  }
}

abstract class Duck {
  abstract flyBehavior: FlyBehavior
  abstract quackBehavior: QuackBehavior
  abstract display(): void
  performFly(): void {
    this.flyBehavior.fly()
  }
  performQuack(): void {
    this.quackBehavior.quack()
  }
  swim(): void {
    console.log('All ducks float,even decoys')
  }
}
class MallardDuck extends Duck {
  flyBehavior: FlyBehavior = new FlyWithWings()
  quackBehavior: QuackBehavior = new Quack()
  display(): void {
    console.log('this is MallarDuck')
    this.performQuack()
    this.performFly()
    this.swim()
  }
}

class ModelDuck extends Duck {
  flyBehavior: FlyBehavior = new FlyRocketPowered()
  quackBehavior: QuackBehavior = new MuteQuack()
  display(): void {
    console.log('this is model duck')
    this.performQuack()
    this.performFly()
    this.swim()
  }
}

class DuckCall extends Quack {}
// const duck1 = new TestDuck()
// duck1.performFly()
// duck1.performQuack()
new MallardDuck().display()
new ModelDuck().display()
new DuckCall().quack()
golang example
go语言没有继承,go语言的interface也比较轻量,类似于python和js这样的鸭子类型了,只是多了类型检查而已,编译阶段找不到对应的函数就会报错了。
golang的interface只能包含函数,然后实现这个interface只要实现同样格式的函数就算实现接口。
整体来说还是比较灵活的,比较简洁的。所以一个空接口interface{}所有类型都实现了它,可以用空接口接收所有类型。
package main

import "fmt"

type SortStrategyer interface {
	sort(list []int) []int
}

type BubbleSortStrategy struct {
}

func (b *BubbleSortStrategy) sort(list []int) []int {
	fmt.Println("do bubble sort")
	return list
}

type QuickSortStrategy struct {
}

func (b *QuickSortStrategy) sort(list []int) []int {
	fmt.Println("do quick sort")
	return list
}

type Sorter struct {
	strategy SortStrategyer
}

func (s *Sorter) doSort(list []int) []int {
	return s.strategy.sort(list)
}

func main() {
	testList := []int{4, 5, 3}
	sort1 := Sorter{strategy: &BubbleSortStrategy{}}
	sort1.doSort(testList)
	sort2 := Sorter{strategy: &QuickSortStrategy{}}
	sort2.doSort(testList)
	sort1.strategy = &QuickSortStrategy{}
	sort1.doSort(testList)
}
dart example
dart 是我用的几种编程语言中语法最接近java的。
typescript也很像java,但是它跟go一样把类型放在变量后面了。
dart的不同之处在于,dart中没有像java一样的interface关键字,dart中每个类都可以当作接口,因此这里我们用了抽象类作为一个接口使用。
abstract class SortStrategy {
  List<int> sort(List<int> data);
}

class BubbleSortStrategy implements SortStrategy {
  @override
  List<int> sort(List<int> data) {
    print('do bubble sort');
    return data;
  }
}

class QuickSortStrategy implements SortStrategy {
  @override
  List<int> sort(List<int> data) {
    print('do qucik sort');
    return data;
  }
}

class Sorter {
  final SortStrategy sortStrategy;
// datr 构造函数语法糖,只需要在参数列表列出初始化参数,赋值自动帮你实现
  Sorter(this.sortStrategy);

  List<int> doSort(List<int> data) {
    return this.sortStrategy.sort(data);
  }
}

main(List<String> args) {
  var sort1 = Sorter(BubbleSortStrategy());
  sort1.doSort([1, 2, 3]);
  var sort2 = Sorter(QuickSortStrategy());
  sort2.doSort([1, 2, 3]);
}
2.😎观察者模式(Observer)
现实例子
也叫做发布订阅模式,这里给出的例子是,求职者订阅了招聘网站的服务,如果有匹配的工作信息,招聘网站会进行推送
简单总结
建立对象间的依赖关系,使得一个对象的状态发生改变时,所有依赖它的对象都能被通知到。
维基百科的描述
观察者模式是一种软件设计模式,在这种模式中,一个称为主体的对象维护一个称为观察者的依赖项列表,并在任何状态更改时自动通知它们(通常通过调用它们的一个方法)。
优缺点
优点
- 开闭原则。 你无需修改发布者代码就能引入新的订阅者类 (如果是发布者接口则可轻松引入发布者类)。
- 你可以在运行时建立对象之间的联系。
typescript example
interface Subject {
  registerObserver(o: Observer): void
  removeObserver(o: Observer): void
  notifyObservers(info: any): void
}

interface Observer {
  update(s: Subject, arg: Object): void
}

class JobInfo {
  protected info: string
  constructor(info: string) {
    this.info = info
  }
  getInfo() {
    return this.info
  }
}

class JobSite implements Subject {
  protected observers: Array<Observer>
  constructor() {
    this.observers = Array<Observer>()
  }
  registerObserver(o: Observer): void {
    this.observers.push(o)
  }
  removeObserver(o: Observer): void {
    const index = this.observers.indexOf(o)
    this.observers.splice(index, 1)
  }
  notifyObservers(info: JobInfo): void {
    for (const o of this.observers) {
      o.update(this, info)
    }
  }

  AddJob(info: JobInfo) {
    console.log('招聘网站有新的工作追加了')

    this.notifyObservers(info)
  }
}

class Jiucai implements Observer {
  name: string
  constructor(name: string) {
    this.name = name
  }
  update(s: Subject, arg: JobInfo): void {
    console.log(`${this.name}收到新工作推送,职位是${arg.getInfo()}`)
  }
}

const zibenjia = new JobSite()

const jiucai1 = new Jiucai('生命1号')
const jiucai2 = new Jiucai('脑白金')

zibenjia.registerObserver(jiucai1)
zibenjia.registerObserver(jiucai2)

zibenjia.AddJob(new JobInfo('web前端'))
zibenjia.AddJob(new JobInfo('算法工程师'))
下面是head first设计模式这本书里面关于气象站和告示板的typescript代码实现
interface Subject {
  registerObserver(o: Observer): void
  removeObserver(o: Observer): void
  notifyObservers(): void
}

interface Observer {
  update(temp: number, humidity: number, pressure: number): void
}

interface DisplayElement {
  display(): void
}

class WeatherData implements Subject {
  private observers: Array<Observer>
  private temperature!: number
  private humidity!: number
  private pressure!: number
  constructor() {
    this.observers = Array<Observer>()
  }
  registerObserver(o: Observer): void {
    this.observers.push(o)
  }
  removeObserver(o: Observer): void {
    const index = this.observers.indexOf(o)
    this.observers.splice(index, 1)
  }
  notifyObservers(): void {
    for (const o of this.observers) {
      o.update(this.temperature, this.humidity, this.pressure)
    }
  }

  measurementsChanged() {
    this.notifyObservers()
  }
  setMeasurements(temperature: number, humidity: number, pressure: number) {
    this.temperature = temperature
    this.humidity = humidity
    this.pressure = pressure
    this.measurementsChanged()
  }
}

class CurrentConditionDisplay implements Observer, DisplayElement {
  private temperature!: number
  private humidity!: number
  private weatherData: Subject
  constructor(weatherData: Subject) {
    this.weatherData = weatherData
    this.weatherData.registerObserver(this)
  }
  update(temp: number, humidity: number, pressure: number): void {
    this.temperature = temp
    this.humidity = humidity
    this.display()
  }

  display(): void {
    console.log(
      `Current conditionsc: ${this.temperature} F degrees and ${this.humidity}% humidity`
    )
  }
}

class StatisticsConditionDisplay implements Observer, DisplayElement {
  private pressure!: number
  private weatherData: Subject
  constructor(weatherData: Subject) {
    this.weatherData = weatherData
    this.weatherData.registerObserver(this)
  }
  update(temp: number, humidity: number, pressure: number): void {
    this.pressure = pressure
    this.display()
  }

  display(): void {
    console.log(`Statistics conditionsc: ${this.pressure} pressure`)
  }
}
const wd = new WeatherData()
const ccd = new CurrentConditionDisplay(wd)
const scd = new StatisticsConditionDisplay(wd)
wd.setMeasurements(80, 65, 30.4)
wd.setMeasurements(82, 75, 28.3)
wd.setMeasurements(78, 90, 36.4)

export {}
dart example
dart中Object不想typescript一样可以接受任何其他类。
所以我这里对observer 用了泛型。
abstract class Observer<T> {
  void update(Subject s, T o);
}

abstract class Subject {
  void registerObserver(Observer o);
  void removeObserver(Observer o);
  void notifyObservers(Object o);
}

class JobInfo {
  late String info;
  JobInfo(this.info);
}

class JobSite implements Subject {
  final List<Observer> observers = [];

  @override
  void registerObserver(Observer o) {
    this.observers.add(o);
  }

  @override
  void removeObserver(Observer o) {
    this.observers.remove(o);
  }

  @override
  void notifyObservers(Object o) {
    for (var item in this.observers) {
      item.update(this, o);
    }
  }

  void addJobInfo(JobInfo j) {
    print('有新的工作信息');
    this.notifyObservers(j);
  }
}

class Jiucai implements Observer<JobInfo> {
  final String name;

  Jiucai(this.name);
  @override
  void update(Subject s, JobInfo o) {
    print("$name收到新的工作推送,职位是${o.info}");
  }
}

main(List<String> args) {
  var zibenjia = JobSite();

  var jiucai1 = Jiucai('李白');
  var jiucai2 = Jiucai('白居易');

  zibenjia.registerObserver(jiucai1);
  zibenjia.registerObserver(jiucai2);
  zibenjia.addJobInfo(JobInfo('AI工程师'));
}
golang example
package main

import "fmt"

type Subject interface {
	registerObserver(o Observer)
	removeObserver(o Observer)
	notifyObservers(s Subject, o interface{})
}

type Observer interface {
	update(s Subject, o interface{})
}

type JobSite struct {
	observers []Observer
}

func (j *JobSite) registerObserver(o Observer) {
	j.observers = append(j.observers, o)
}

func (j *JobSite) removeObserver(o Observer) {
	for i := 0; i < len(j.observers); i++ {
		if o == j.observers[i] {
			j.observers = append(j.observers[:i], j.observers[i+1:]...)
			return
		}
	}
}
func (j *JobSite) notifyObservers(s Subject, o interface{}) {
	for i := 0; i < len(j.observers); i++ {
		j.observers[i].update(s, o)
	}
}
func (j *JobSite) addJobInfo(info string) {
	fmt.Println("新工作信息入库")
	j.notifyObservers(j, info)
}

type Jiucai struct {
	name string
}

func (j *Jiucai) update(s Subject, o interface{}) {
	fmt.Printf("%s收到新的工作推送,职位是%v\n", j.name, o)
}
func main() {
	zibenjia := JobSite{observers: []Observer{}}
	jiucai1 := Jiucai{name: "张三"}
	jiucai2 := Jiucai{name: "李四"}
	zibenjia.registerObserver(&jiucai1)
	zibenjia.registerObserver(&jiucai2)
	zibenjia.addJobInfo("喝牛奶")

}
3.👮命令模式(Command)
亦称: 动作、事务、Action、Transaction
真实世界的例子
一个例子是餐馆点餐, 您(即客户)询问服务员(即,调用者)携带一些食物(即命令)和服务员只需将该请求转发给厨师(即接收者),该请求具有关于烹饪的内容和如何烹饪的知识。 另一个例子是您(即客户端)使用遥控器(即,Command)的电视(即,接收器)打开(即,接收器)。
简单总结
允许您在对象中封装动作。此模式背后的关键思想是提供分离客户机与接收者的方法。
维基百科的解释
在面向对象编程中,命令模式是一种行为设计模式,在这种模式中,一个对象被用来封装在以后执行一个动作或触发一个事件所需的所有信息。该信息包括方法名、拥有该方法的对象和方法参数的值。
优缺点
优点
- 单一职责原则。 你可以解耦触发和执行操作的类。
- 开闭原则。 你可以在不修改已有客户端代码的情况下在程序中创建新的命令。
- 你可以实现撤销和恢复功能。
- 你可以实现操作的延迟执行。
- 你可以将一组简单命令组合成一个复杂命令。
缺点
- 代码可能会变得更加复杂, 因为你在发送者和接收者之间增加了一个全新的层次。
typescript example
下面是一个遥控器控制灯泡开关的实现。
// 灯泡
class Bulb {
  turnOn() {
    console.log('Bulb has been lit')
  }
  turnOff() {
    console.log('be dark')
  }
}

interface Command {
  execute(): void
  undo(): void
  redo(): void
}

class TurnOn implements Command {
  protected bulb: Bulb
  constructor(bulb: Bulb) {
    this.bulb = bulb
  }
  execute(): void {
    this.bulb.turnOn()
  }
  undo(): void {
    this.bulb.turnOff()
  }
  redo(): void {
    this.execute()
  }
}
class TurnOff implements Command {
  protected bulb: Bulb
  constructor(bulb: Bulb) {
    this.bulb = bulb
  }
  execute(): void {
    this.bulb.turnOff()
  }
  undo(): void {
    this.bulb.turnOn()
  }
  redo(): void {
    this.execute()
  }
}

class RemoteControl {
  submit(command: Command) {
    command.execute()
  }
}

const bulb = new Bulb()

const turnOn = new TurnOn(bulb)
const turnOff = new TurnOff(bulb)

const remote = new RemoteControl()
remote.submit(turnOn)
remote.submit(turnOff)
4.📒 模板方法(Template Method)
真实世界的例子
假设我们要建房子。建造的步骤可能像这样
-
准备好房子的地基
-
构建墙
-
添加屋顶
-
添加其他楼层
这些步骤的顺序永远不会改变,例如,你不能在建造墙壁之前建造屋顶,但每个步骤都可以修改,例如,墙壁可以由木材、聚酯或石头制成。
简单总结
模板方法定义了如何执行某个算法的框架,但将这些步骤的实现推迟到子类。
维基百科的描述
在软件工程中,模板方法模式是一种行为设计模式,它在操作中定义算法的程序框架,将一些步骤推迟到子类中。它允许人们在不改变算法结构的情况下重新定义算法的某些步骤。
优缺点
优点
- 你可仅允许客户端重写一个大型算法中的特定部分, 使得算法其他部分修改对其所造成的影响减小。
- 你可将重复代码提取到一个超类中。
缺点
- 部分客户端可能会受到算法框架的限制。
- 通过子类抑制默认步骤实现可能会导致违反_里氏替换原则_(即派生类可以在程序中替换基类对象)。
- 模板方法中的步骤越多, 其维护工作就可能会越困难。
typescript example
假设我们有一个构建工具,可以帮助我们测试、lint、构建、生成构建报告(即代码覆盖报告、linting报告等),并将我们的应用部署到测试服务器上。首先,我们有为构建算法指定骨架的基类
abstract class Builder {
  build() {
    this.test()
    this.lint()
    this.assemble()
    this.deploy()
  }
  abstract test(): void
  abstract lint(): void
  abstract assemble(): void
  abstract deploy(): void
}

class AndroidBuilder extends Builder {
  test(): void {
    console.log('Running android test')
  }
  lint(): void {
    console.log('Linting the android code.')
  }
  assemble(): void {
    console.log('Assembling the andorid build.')
  }
  deploy(): void {
    console.log('Deploying android build to server')
  }
}

class IosBuilder extends Builder {
  test(): void {
    console.log('Running ios test')
  }
  lint(): void {
    console.log('Linting the ios code.')
  }
  assemble(): void {
    console.log('Assembling the ios build.')
  }
  deploy(): void {
    console.log('Deploying ios build to server')
  }
}

const androidBuilder = new AndroidBuilder()
androidBuilder.build()
const iosBuilder = new IosBuilder()
iosBuilder.build()
5.➿迭代器模式 (Iterator)
现实的例子
一个旧的收音机将是迭代器的一个很好的例子,用户可以从某个拼搭开始,然后使用下一个或上一个按钮通过相应的通道。或者以MP3播放器或电视机为例,你可以按下一个和上一个按钮来浏览连续的频道,或者换句话说,它们都提供了一个界面来迭代各个频道、歌曲或电台。
又比如说列表和数组的遍历方式不同,你可以用迭代器模式把他们封装成一致的使用方式.
简单总结
迭代器模式是一种行为设计模式 让你能在不暴露集合底层表现形式 (列表、 栈和树等) 的情况下遍历集合中所有的元素。
维基百科的解释
在面向对象编程中,迭代器模式是一种设计模式,其中迭代器用于遍历容器并访问容器的元素。迭代器模式将算法与容器解耦;在某些情况下,算法必须是特定于容器的,因此不能解耦。
优缺点
优点
- 单一职责原则。 通过将体积庞大的遍历算法代码抽取为独立的类, 你可对客户端代码和集合进行整理。
- 开闭原则。 你可实现新型的集合和迭代器并将其传递给现有代码, 无需修改现有代码。
- 你可以并行遍历同一集合, 因为每个迭代器对象都包含其自身的遍历状态。
- 相似的, 你可以暂停遍历并在需要时继续。
缺点
- 如果你的程序只与简单的集合进行交互, 应用该模式可能会矫枉过正。
- 对于某些特殊集合, 使用迭代器可能比直接遍历的效率低。
typescript example
/**
 * Iterator Design Pattern
 *
 * Intent: Lets you traverse elements of a collection without exposing its
 * underlying representation (list, stack, tree, etc.).
 */

interface Iterator<T> {
  // Return the current element.
  current(): T

  // Return the current element and move forward to next element.
  next(): T

  // Return the key of the current element.
  key(): number

  // Checks if current position is valid.
  valid(): boolean

  // Rewind the Iterator to the first element.
  rewind(): void
}

interface Aggregator {
  // Retrieve an external iterator.
  getIterator(): Iterator<string>
}

/**
 * Concrete Iterators implement various traversal algorithms. These classes
 * store the current traversal position at all times.
 */

class AlphabeticalOrderIterator implements Iterator<string> {
  private collection: WordsCollection

  /**
   * Stores the current traversal position. An iterator may have a lot of
   * other fields for storing iteration state, especially when it is supposed
   * to work with a particular kind of collection.
   */
  private position: number = 0

  /**
   * This variable indicates the traversal direction.
   */
  private reverse: boolean = false

  constructor(collection: WordsCollection, reverse: boolean = false) {
    this.collection = collection
    this.reverse = reverse

    if (reverse) {
      this.position = collection.getCount() - 1
    }
  }

  public rewind() {
    this.position = this.reverse ? this.collection.getCount() - 1 : 0
  }

  public current(): string {
    return this.collection.getItems()[this.position]
  }

  public key(): number {
    return this.position
  }

  public next(): string {
    const item = this.collection.getItems()[this.position]
    this.position += this.reverse ? -1 : 1
    return item
  }

  public valid(): boolean {
    if (this.reverse) {
      return this.position >= 0
    }

    return this.position < this.collection.getCount()
  }
}

/**
 * Concrete Collections provide one or several methods for retrieving fresh
 * iterator instances, compatible with the collection class.
 */
class WordsCollection implements Aggregator {
  private items: string[] = []

  public getItems(): string[] {
    return this.items
  }

  public getCount(): number {
    return this.items.length
  }

  public addItem(item: string): void {
    this.items.push(item)
  }

  public getIterator(): Iterator<string> {
    return new AlphabeticalOrderIterator(this)
  }

  public getReverseIterator(): Iterator<string> {
    return new AlphabeticalOrderIterator(this, true)
  }
}

/**
 * The client code may or may not know about the Concrete Iterator or Collection
 * classes, depending on the level of indirection you want to keep in your
 * program.
 */
const collection = new WordsCollection()
collection.addItem('First')
collection.addItem('Second')
collection.addItem('Third')

const iterator = collection.getIterator()

console.log('Straight traversal:')
while (iterator.valid()) {
  console.log(iterator.next())
}

console.log('')
console.log('Reverse traversal:')
const reverseIterator = collection.getReverseIterator()
while (reverseIterator.valid()) {
  console.log(reverseIterator.next())
}
6.💢 状态模式(State)
现实的例子
假设您正在使用一些绘图应用程序,您选择画笔进行绘制。现在笔刷会根据选择的颜色改变它的行为,例如,如果你选择了红色,它就会以红色绘制,如果是蓝色,它就会以蓝色绘制,等等。
智能手机的按键和开关会根据设备当前状态完成不同行为:
- 当手机处于解锁状态时, 按下按键将执行各种功能。
- 当手机处于锁定状态时, 按下任何按键都将解锁屏幕。
- 当手机电量不足时, 按下任何按键都将显示充电页面。
简单总结
状态模式是一种行为设计模式, 让你能在一个对象的内部状态变化时改变其行为, 使其看上去就像改变了自身所属的类一样。
维基百科的解释
状态模式是一种行为软件设计模式,其以面向对象方式实现状态机。 利用状态模式,通过将每个单独的状态作为状态模式接口的派生类实现每个单独的状态来实现状态机,并通过调用由模式的超类定义的方法来实现状态转换。 状态模式可以被解释为能够通过模式接口中定义的方法的调用来切换当前策略的策略模式。
优缺点
优点
- 单一职责原则。 将与特定状态相关的代码放在单独的类中。
- 开闭原则。 无需修改已有状态类和上下文就能引入新状态。
- 通过消除臃肿的状态机条件语句简化上下文代码。
缺点
- 如果状态机只有很少的几个状态, 或者很少发生改变, 那么应用该模式可能会显得小题大作。
与其他模式的关系
-
桥接模式、 状态模式和策略模式 (在某种程度上包括适配器模式) 模式的接口非常相似。 实际上, 它们都基于组合模式——即将工作委派给其他对象, 不过也各自解决了不同的问题。 模式并不只是以特定方式组织代码的配方, 你还可以使用它们来和其他开发者讨论模式所解决的问题。
-
状态可被视为策略的扩展。 两者都基于组合机制: 它们都通过将部分工作委派给 “帮手” 对象来改变其在不同情景下的行为。 策略使得这些对象相互之间完全独立, 它们不知道其他对象的存在。 但状态模式没有限制具体状态之间的依赖, 且允许它们自行改变在不同情景下的状态。
typescript example
让我们举一个文本编辑器的例子,它可以让你改变输入的文本的状态,例如,如果你选择了粗体,它就开始写粗体,如果是斜体,然后是斜体等等。
interface WritingState {
  write(words: string): void
}

class UpperCase implements WritingState {
  write(words: string): void {
    console.log(`Uppercase:${words}`)
  }
}

class LowerCase implements WritingState {
  write(words: string): void {
    console.log(`Lowercase:${words}`)
  }
}

class DefaultText implements WritingState {
  write(words: string): void {
    console.log(`DefaultText:${words}`)
  }
}

class TextEditor {
  protected state: WritingState
  constructor(state: WritingState) {
    this.state = state
  }
  setState(state: WritingState) {
    this.state = state
  }
  type(words: string) {
    this.state.write(words)
  }
}

const editor = new TextEditor(new DefaultText())
editor.type('hello')
editor.setState(new UpperCase())
editor.type('1')

editor.setState(new LowerCase())

editor.type('2')
7.🔗责任链模式 Chain of Responsibility
现实的例子
例如,您在您的帐户中设置了三个付款方式(A,B和C)设置; 每个都有不同的量。 A有100美元,B有300美元,C具有1000美元,你偏好的购买顺序是先A后B后C.您尝试购买价值210美元的东西。 使用责任链,首先将检查它是否可以购买购买,如果是购买,则将进行购买,并且链将被打破。 如果没有,请求将前进以向帐户B检查金额如果是链将被打破,否则请求将继续转发,直到它找到合适的处理程序。 这里,B和C是链条的链接,整个现象是责任链。
简单总结
责任链模式是一种行为设计模式, 允许你将请求沿着处理者链进行发送。 收到请求后, 每个处理者均可对请求进行处理, 或将其传递给链上的下个处理者。
优缺点
优点
- 你可以控制请求处理的顺序。
- 单一职责原则。 你可对发起操作和执行操作的类进行解耦。
- 开闭原则。 你可以在不更改现有代码的情况下在程序中新增处理者。
缺点
- 部分请求可能未被处理。
typescript example
abstract class Account {
  protected successor: Account | null = null
  protected abstract balance: number
  setNext(account: Account) {
    this.successor = account
  }
  pay(amountToPay: number) {
    if (this.canPay(amountToPay)) {
      console.log(`paid ${amountToPay} using ${this.constructor.toString()}`)
    } else if (this.successor) {
      console.log('cant pay ,using next...')
      this.successor.pay(amountToPay)
    } else {
      throw new Error('None of the accounts have enough balance')
    }
  }
  canPay(amount: number): boolean {
    return this.balance >= amount
  }
}

class Bank extends Account {
  protected balance: number
  constructor(balance: number) {
    super()
    this.balance = balance
  }
}

class Paypal extends Account {
  protected balance: number
  constructor(balance: number) {
    super()
    this.balance = balance
  }
}

class Bitcoin extends Account {
  protected balance: number
  constructor(balance: number) {
    super()
    this.balance = balance
  }
}

const bank = new Bank(100)
const paypal = new Paypal(200)
const bitcoin = new Bitcoin(300)

bank.setNext(paypal)
paypal.setNext(bitcoin)
bank.pay(259)
8.👽中介者模式(Mediator)
亦称: 调解人、控制器、Intermediary、Controller
现实的例子
一个一般的例子是,当你用手机和某人交谈时,有一个网络提供商坐在你和他们之间,你的谈话经过它而不是直接发送。在这种情况下,网络提供者是中介。
简单总结
中介者模式是一种行为设计模式, 能让你减少对象之间混乱无序的依赖关系。 该模式会限制对象之间的直接交互, 迫使它们通过一个中介者对象进行合作。
优缺点
优点
- 单一职责原则。 你可以将多个组件间的交流抽取到同一位置, 使其更易于理解和维护。
- 开闭原则。 你无需修改实际组件就能增加新的中介者。
- 你可以减轻应用中多个组件间的耦合情况。
- 你可以更方便地复用各个组件。
缺点
一段时间后, 中介者可能会演化成为 上帝对象(中介者本身会过于复杂)。
typescript example
interface ChatRoomMediator {
  showMessage(user: User, message: string): void
}

class ChatRoom implements ChatRoomMediator {
  showMessage(user: User, message: string): void {
    const time = new Date().toUTCString()
    const sender = user.getName()
    console.log(`${time}[${sender}]:${message}`)
  }
}

class User {
  protected name: string
  protected chatMediator: ChatRoomMediator
  constructor(name: string, chatMediator: ChatRoomMediator) {
    this.name = name
    this.chatMediator = chatMediator
  }
  getName() {
    return this.name
  }
  send(message: string) {
    this.chatMediator.showMessage(this, message)
  }
}

const mediator = new ChatRoom()

const john = new User('John Doe', mediator)
const jane = new User('Jane Doe', mediator)

john.send('hi,its me')
jane.send('hey!')
9.💾备忘录模式(Memento)
亦称: 快照、Snapshot
现实的例子
以计算器为例,无论何时你执行一些计算,最后的计算都会保存在内存中,这样你就可以使用某些操作按钮返回计算器并恢复它。
简单总结
备忘录模式是一种行为设计模式, 允许在不暴露对象实现细节的情况下保存和恢复对象之前的状态。
适合的使用场景
当你需要创建对象状态快照来恢复其之前的状态时, 可以使用备忘录模式。
备忘录模式允许你复制对象中的全部状态 (包括私有成员变量), 并将其独立于对象进行保存。 尽管大部分人因为 “撤销” 这个用例才记得该模式, 但其实它在处理事务 (比如需要在出现错误时回滚一个操作) 的过程中也必不可少。
当直接访问对象的成员变量、 获取器或设置器将导致封装被突破时, 可以使用该模式。
备忘录让对象自行负责创建其状态的快照。 任何其他对象都不能读取快照, 这有效地保障了数据的安全性。
优缺点
优点
- 你可以在不破坏对象封装情况的前提下创建对象状态快照。
- 你可以通过让负责人维护原发器状态历史记录来简化原发器代码。
缺点
- 如果客户端过于频繁地创建备忘录, 程序将消耗大量内存。
- 负责人必须完整跟踪原发器的生命周期, 这样才能销毁弃用的备忘录。
- 绝大部分动态编程语言 (例如 PHP、 Python 和 JavaScript) 不能确保备忘录中的状态不被修改。
typescript example
class EditorMemento {
  protected content: string
  constructor(content: string) {
    this.content = content
  }
  getContent() {
    return this.content
  }
}

class Editor {
  protected content = ''
  type(words: string) {
    this.content = this.content + words
  }
  getContent() {
    return this.content
  }
  save() {
    return new EditorMemento(this.content)
  }
  restore(memento: EditorMemento) {
    this.content = memento.getContent()
  }
}

const editor = new Editor()
editor.type('first sentence\n')
editor.type('this is second\n')
const saved = editor.save()

editor.type('third\n')
console.log(editor.getContent())
editor.restore(saved)
console.log(editor.getContent())

export {}
10.🏃访问者模式(Visitor)
现实的例子
考虑一下去迪拜旅游的人。他们只需要一种方式(即签证)进入迪拜。到达后,他们可以自己来参观迪拜的任何地方,而不需要申请许可或行走一大段距离来参观这里的任何地方;只要让他们知道一个地方,他们就可以去参观。访客模式可以让你做到这一点,它可以帮助你添加要参观的地方,这样他们可以尽可能多地参观,而不必做任何跑腿的工作
简单总结
访问者模式是一种行为设计模式, 它能将算法与其所作用的对象隔离开来。
优缺点
优点
- 开闭原则。 你可以引入在不同类对象上执行的新行为, 且无需对这些类做出修改。
- 单一职责原则。 可将同一行为的不同版本移到同一个类中。
- 访问者对象可以在与各种对象交互时收集一些有用的信息。 当你想要遍历一些复杂的对象结构 (例如对象树), 并在结构中的每个对象上应用访问者时, 这些信息可能会有所帮助。
缺点
- 每次在元素层次结构中添加或移除一个类时, 你都要更新所有的访问者。
- 在访问者同某个元素进行交互时, 它们可能没有访问元素私有成员变量和方法的必要权限。
typescript example
interface Animal {
  accept(operation: AnimalOperation): void
}

interface AnimalOperation {
  visitMonkey(monkey: Monkey): void
  visitLion(lion: Lion): void
  visitDolphin(dolphin: Dolphin): void
}

class Monkey implements Animal {
  shout() {
    console.log('Ooh oo aa aa!')
  }
  accept(operation: AnimalOperation) {
    operation.visitMonkey(this)
  }
}

class Lion implements Animal {
  accept(operation: AnimalOperation): void {
    operation.visitLion(this)
  }
  roar() {
    console.log('Roaaar!')
  }
}
class Dolphin implements Animal {
  accept(operation: AnimalOperation): void {
    operation.visitDolphin(this)
  }
  speak() {
    console.log('Tuut tuttu tuutt')
  }
}

class Speak implements AnimalOperation {
  visitMonkey(monkey: Monkey): void {
    monkey.shout()
  }
  visitLion(lion: Lion): void {
    lion.roar()
  }
  visitDolphin(dolphin: Dolphin): void {
    dolphin.speak()
  }
}

const monkey = new Monkey()
const lion = new Lion()
const dolphin = new Dolphin()
const speak = new Speak()
monkey.accept(speak)
lion.accept(speak)
dolphin.accept(speak)
export {}